"Pelton Crane Sterilizer Won't Heat?"
You Can Fix It Yourself
And Save A Lot Of Money On Repair Costs
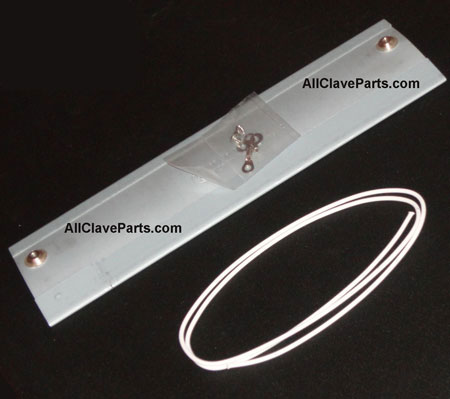 
PELTON CRANE HEATER REPAIR KIT
HEATING ELEMENT
* 1250W, 120VAC, ~12ohms
* Sheathing: Electrogalvanized Sheet Steel
* Includes heating element, hardware, and (3 ft) 14 AWG White Wire-High Temp
OVERHEAT THERMOSTAT
* Rated: Open between 220 degrees F and 350 degrees F; Factory set at 295 degrees F.
* Includes thermostat, and (2) terminal screw
All Prices Include Ground Shipping & Detailed Installation Instructions
*Kits # 1 Includes 1 OverHeat Thermostat + 1 Heating Element
*Kits # 2 Includes 1 OverHeat Thermostat + 2 Heating Elements
*Kits # 3 Includes 1 OverHeat Thermostat + 3 Heating Elements
If your Pelton Crane Sterlizer is not heating like it should, the problem may be
one that you can fix yourself. Diagnosing & repairing it is not as complex as you might think.
But first, a basic understanding of what it does is in order: You turn the knob
to fill until the water reaches a predetermined level. You place the instruments
inside and turn it to sterilize. The Electric Heating elements (3 of them) heat
the water in the chamber past the boiling point (212 degrees) turning the water into steam.
The chamber is airtight so when the water turns from solid to gas, the entire
chamber is filled with steam and pressure begins to build. By turning itself off
and on, the sterilizer maintains the temperature, which in turn keeps the pressure
at the desired level. This combination over a period of time (the cycle) kills
all living organisms and effectively sterilizes what ever is in the chamber.
The most common problem causing the loss of heat is a heating element going out.
You can test to see if this is the problem with any kind of ohmmeter.
WARNING: UNPLUG THE UNIT BEFORE PROCEEDING & LEAVE IT UNPLUGGED
Remove the cabinet by removing the screws from the bottom of the sides and the
back. Once the screws are removed, lift the back of the cabinet slightly and push
it forward (there is a small lip in the front that is about ½ inch wide). Once
the lip is cleared, just lift the cabinet off and set it aside. You will want to
remove the insulation surrounding the chamber. Just lift it off and set it inside
of the cabinet so it is out of the way.
Now, check all the wires around the controls and under the chamber to make sure
none of them have broken. Located on the front of the chamber towards the bottom
is the Overheat Thermostat. You will notice wires under the screws on the
top of the Overheat Thermostat. With the ohmmeter set to read ohms, place one
lead on one screw head and the second lead on the other screw head. If the needle
on the ohmmeter stays to the left (doesn’t move) that means the reading is infinity.
There is a dead short and the Overheat Thermostat will have to be replaced.
To check the Heating Elements out will
require a little more work, but is not difficult. The three heating elements are
positioned on the bottom of the chamber so there is one close to you, one on the
bottom (referred to as the center element) and one on the side away from you.
Each of these heating elements has a screw attached at each end with wires attached.
Place a lead from the ohmmeter on each end. If the meter stays in the infinity
position as described above, there is a dead short and the element will have to
be replaced. The center element is the most common to go out, but check all 3.
If the heating elements are okay, but the Overheat Thermostat is bad, you
can replace the thermostat alone. But if you are replacing a heating element, the
switch should be replaced at the same time.
For a Complete Listing Of Autoclave Parts, please vist our Autoclave Division.
WeKnowTheDrill.com ---> We Under Promise and Over Deliver
|